In the last article on core endurance, I went over some pretty standard stuff to help you gain endurance in the core. If you don’t feel like clicking and reading, the reasons were pretty simple:
- Research indicates that core endurance is more helpful for injury prevention
- Being stable, while useful, isn’t quite as useful as stabilizing the lumbopelvic are while moving your other limbs
- Movement with stability elsewhere gives us context.
To add, I defined the core as your pelvis and spine, or your back, butt, and abs. This keeps things pretty simple, all around.
So what you want to do now is introduce more context to go along with these same general ideas to progress and get stronger. And that’s exactly what we’re going to do today with another set of five exercises.
Hanging leg Raises
I like this particular one for a few reasons. For one thing, it’s dynamic, which is the goal. In addition to that, it tests the mettle of your grip since you have to hang from the pull-up bar. And it puts the spine in traction, which is a great feeling when you have all kinds of weight from your squats and deadlifts (not to mention gravity in general) compressing your spinal column.
So what you want to focus on here is twofold:
- Don’t flail around. You want this to be a solid, smooth, and controlled movement. If you can’t get a good range of motion on it, bend your knees more. The less knee flexion you have, the harder it becomes
- Like I mentioned in the last article, the plank is the basis. Start by doing a hanging plank
- Squeeze the glutes, tighten the abs
- Raise your legs with control
- Squeeze your butt again as you lower to keep it control
One last tip that helps is to consider it a set of singles, as opposed to a set of reps. With that in mind, make sure you are back to your hanging plank position before you start the next rep.
Bird Dog Row
You’re familiar with the bird dog, I hope. If not, you start in a quadruped position—on hands and knees—with your shoulders over your hands. Then you kick your left leg out while squeezing the glute, and reach forward with your right hand. So it’s opposite arm and leg moving at once. Minimize the lower back arch by focusing on squeezing the glute of the working leg. Once you get that, repeat with your other limbs.
This version is a bit more advance, with more movement and more of a balancing component. Instead of reaching out with the other arm, you row a dumbbell, while keeping the leg extended.
Also, since you are doing this on a bench, be careful and exercise caution. The added dumbbell row makes it an anti rotation exercise, so err on the side of too light, as opposed to too heavy. I don’t want you face planting off the bench.
When you perfect it, go heavier and squeeze harder.
Loaded Dead Bugs
I wish I can tell you this one was a fun one. It’s not. But it’s effective. The version I am doing here uses two dumbbells, and like the dead bug, you’re using your opposite leg and arm in tandem.
Note the pattern. You’re squeezing your butt and pressing your lower back to the floor, and keeping it there. If your glutes are too big, you might not be able to reach your lower back all the way to the floor, and that’s fine. To make this easier to perform, imagine you’re trying to reach the front of your pelvis to your face, also known as posterior pelvic tilt.
Start with your hips flexed, the bottom of the feet pointing to the sky. Your arms, loaded with the dumbbells, also pointed skyward.
Keeping the back to the floor as mentioned, lower your right leg and left arm. Go as low as you can, and then reverse it and repeat on the other side.
If you feel yourself lose the position, all you have to do is shorten the range of motion.
Should you find this version too difficult, use both hands to hold one dumbbell, and lower them together along with the working leg. After that, you can progress to this version.
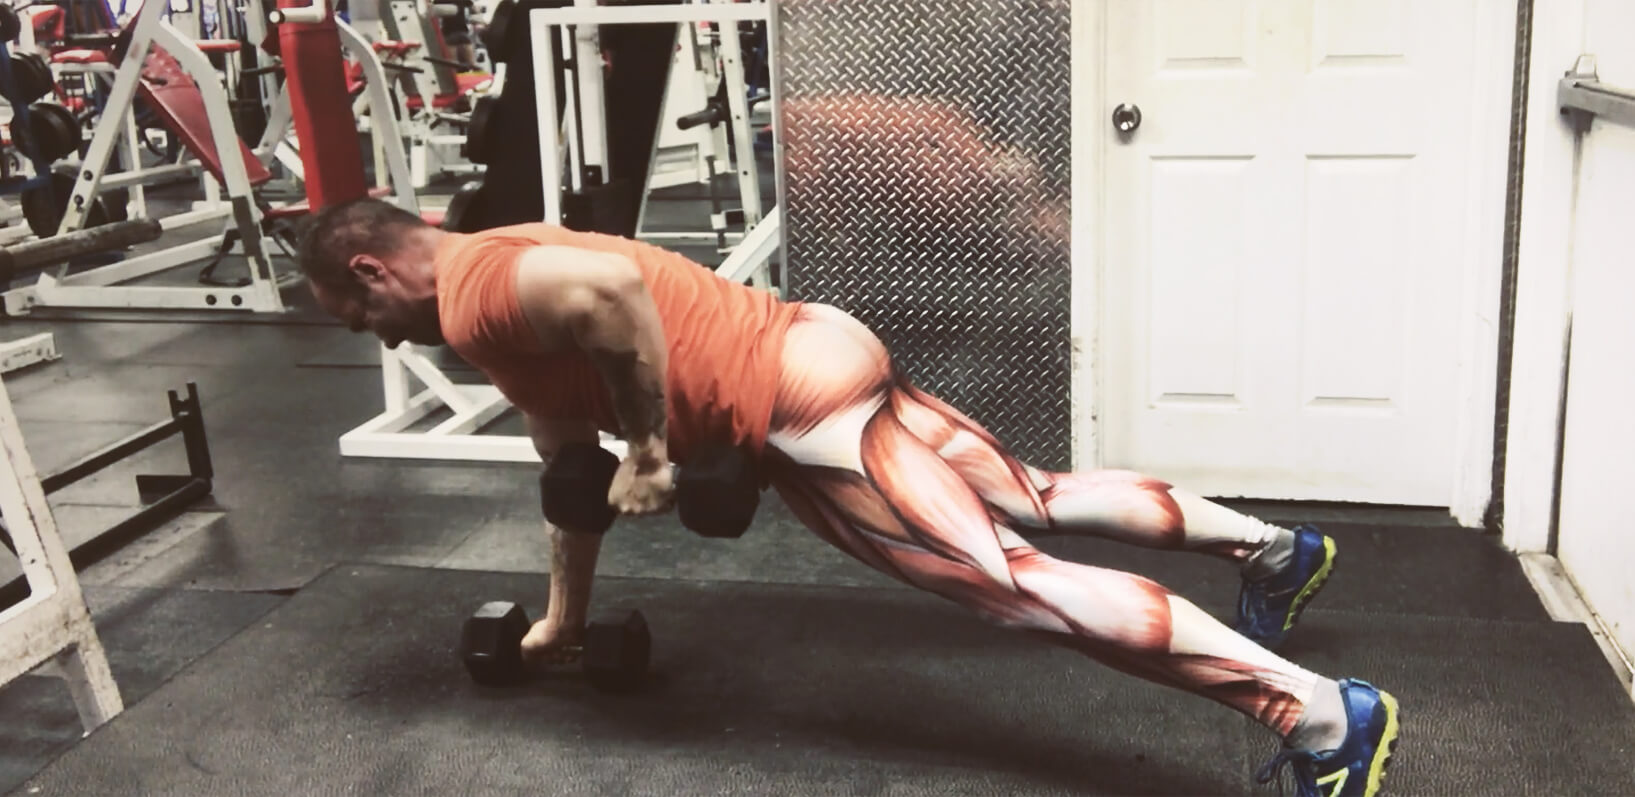
Renegade Row
This one is also an exercise in brutality.
In theory, it is simple. You plank on two dumbbells. You row one of them. Return to starting position, and repeat on the other side.
You don’t want to compensate by shifting your weight. To avoid that, spread your legs wider. The wider they go, the bigger the base of support. Take your legs in and it becomes substantially harder.
If you need to make it even easier, you can practice the same thing without any external loading. So you’d be rowing your empty hand. And while that version is easier, it still will give you a solid workout without too much form degradation.
Tall Kneeling Land Mine Anti Rotation
This one isn’t something you see often, but it’s deceptively tough. One thing you want to look out for is any leaning, shifting, or lateral flexion to the non-working side.
Start with the bar above you and slowly bring it to your side. To keep your position, squeeze your glutes and brace your abs. Return to the start position and repeat on the other side.
If you need a regression, you have some options. The first option is to lessen the range of motion to something you are comfortable with. You can also press the weight straight up. This option is much easier, but the rules of leaning and lateral flexing still apply. The position is paramount.
Conclusion
So if you combine the last article with this one, you have nine different exercises to choose from. They progress from easy (well, kind of easy) to “kill me now.” In addition to that, you have regressions at your disposal to make this process an easier one.
To implement, you have a few different options. I pick two exercises. If I am squatting and/or deadlifting, I will use two exercises as a warm up. Usually, the leg raise and the renegade row. For me, the tension of these two particular exercises really helps me accomplish the same when I squat and deadlift, but you will have to experiment and find what works for you.
For an upper body day, I’ll do the bird dog row and the dead bugs, or any of the other two depending on how I feel. I prefer doing them at the beginning because, by the end of the workout, it’s too easy for me to say “yeah, I did enough. I’m going home.” But again, the choice is yours.
One last thing that helps is to video yourself. If you negate any of the cues, it shows up on video. My coach, Meghan Callaway, gave me a nifty tip to keep the torso position tight. That tip is to make sure your shirt is ruffled. To that end, you’ll notice I keep my neck flexed. If your neck can handle it, your position will vastly improve, and eventually, you will be able to keep your entire spine straight. So neck flexed, shirt ruffled, and you’re in. Keep that in mind as you try it, and run the experiments and grow stronger.